Cherry Pie Bars
Introduction
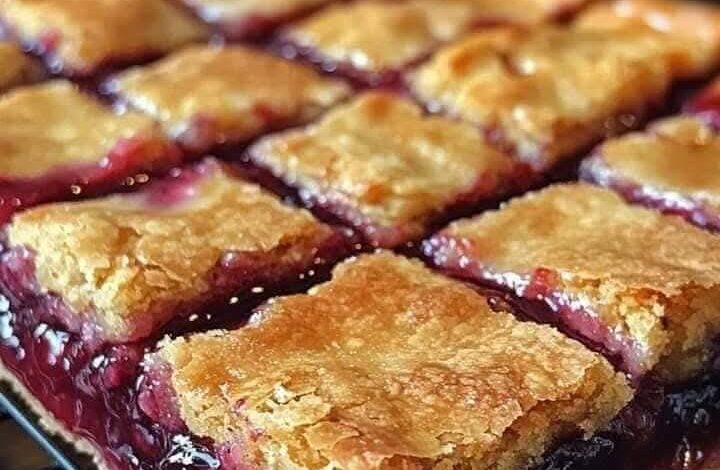
There’s something incredibly comforting about Cherry Pie Bars — that perfect balance of buttery crust, sweet-tart cherry filling, and a light glaze that ties everything together. Imagine all the flavors of a classic cherry pie but in an easy-to-share bar form that’s perfect for parties, holidays, bake sales, or cozy weekends at home.
Unlike a traditional pie, Cherry Pie Bars are simple to prepare and even easier to serve. You don’t have to fuss with rolling out crusts or worrying about soggy bottoms. Instead, you’ll be layering a soft, buttery batter, luscious cherry filling, and a simple glaze that adds just the right amount of sweetness.
Whether you’re serving them for a family gathering or looking for a dessert that travels well, Cherry Pie Bars always deliver. The combination of almond extract and cherry filling creates that nostalgic flavor reminiscent of old-fashioned bakery treats — comforting, classic, and absolutely irresistible.
Why This Recipe Works
What makes Cherry Pie Bars such a reliable and crowd-pleasing dessert comes down to a few key factors:
Foolproof Batter Base – The crust doubles as both the bottom and top layer, giving the bars structure and a soft, cake-like texture. Because you’re using a simple creamed-butter mixture, the crust turns out tender every single time.
Cherry Pie Filling Shortcut – Using canned cherry pie filling ensures consistent sweetness and texture, saving time without compromising flavor. The cherries stay juicy and vibrant even after baking.
Perfect Flavor Balance – The almond and vanilla extracts complement the cherries beautifully, giving these bars a bakery-quality depth of flavor.
No Special Tools Needed – All you need is a mixing bowl, a spatula, and a baking pan. No pie tins, pastry cutters, or chilling required.
Versatile and Adaptable – While the recipe highlights cherries, you can easily swap in blueberry, apple, or raspberry filling for different variations.
Crowd-Friendly Format – Unlike pie slices that crumble, Cherry Pie Bars cut neatly into squares, making them ideal for buffets, lunchboxes, or potlucks.
This recipe is the perfect blend of convenience and homemade charm — easy enough for beginners, but satisfying for seasoned bakers who appreciate a nostalgic treat.
What You’ll Need for This Recipe
Here’s everything you’ll need to make the most delicious Cherry Pie Bars:
For the Crust:
1 cup butter, softened – Creates a rich, tender base. Room-temperature butter ensures smooth creaming.
2 cups sugar – Balances the tartness of the cherries and gives the crust that classic sweetness.
4 large eggs – Add structure and moisture, keeping the bars soft but sturdy.
1 teaspoon vanilla extract – Enhances the overall flavor.
¼ teaspoon almond extract – The secret ingredient that pairs perfectly with cherries.
3 cups all-purpose flour – Provides structure and body.
1 teaspoon salt – Brings out all the flavors and keeps the sweetness in check.
For the Filling:
2 cans (21 oz each) cherry pie filling – The star of the show, adding a bright, tangy layer.
For the Glaze:
1 cup powdered sugar – For that smooth, sweet drizzle.
½ teaspoon vanilla extract – Adds warmth to the glaze.
½ teaspoon almond extract – Echoes the flavor from the crust.
2 tablespoons milk – Thins the glaze to the perfect drizzling consistency.
Equipment:
15x10x1-inch baking pan (or substitute a 9×13 pan with adjusted baking time)
Electric mixer or hand whisk
Mixing bowls
Spatula
Wire cooling rack
These simple ingredients come together beautifully to make Cherry Pie Bars that taste like they came straight from your favorite bakery.
How to Make Cherry Pie Bars
Step 1: Preheat and Prepare
Start by preheating your oven to 350°F (175°C). Grease and flour your 15x10x1-inch baking pan, or line it with parchment paper for easier removal later.
Step 2: Cream the Butter and Sugar
In a large bowl, cream together 1 cup of softened butter and 2 cups of sugar until light and fluffy. This step is crucial because it creates air pockets in the batter, leading to a soft, cake-like texture once baked.
Step 3: Add Eggs and Extracts
Add the 4 eggs, one at a time, mixing well after each addition. Stir in vanilla extract and almond extract. The combination of the two extracts gives Cherry Pie Bars that signature flavor that’s both comforting and slightly sophisticated.
Step 4: Combine Dry Ingredients
In a separate bowl, whisk together flour and salt. Gradually add this to the butter mixture, stirring until just combined. Overmixing can make the crust tough, so stop as soon as no streaks of flour remain.
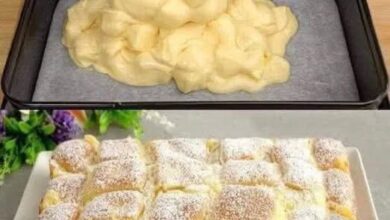
Step 5: Assemble the Layers
Spread about 3 cups of the batter evenly in the bottom of the prepared pan. This forms your crust. Then, spoon the cherry pie filling evenly over the top, spreading gently so it covers the surface. Drop spoonfuls of the remaining batter over the cherry layer — it won’t cover completely, but that’s the beauty of it. The cherries peek through for a lovely, rustic look once baked.
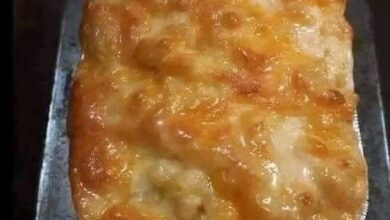
Step 6: Bake
Bake in the preheated oven for 30–35 minutes, or until a toothpick inserted in the center comes out clean and the edges are lightly golden. If you’re using a smaller 9×13-inch pan, add 5–10 extra minutes to the baking time.
Step 7: Cool Completely
Transfer the pan to a wire rack and let it cool completely. This step helps the bars set and makes cutting easier.
Step 8: Prepare the Glaze
In a small bowl, whisk together powdered sugar, vanilla extract, almond extract, and milk until smooth. Adjust with more milk or sugar to reach your preferred consistency.
Step 9: Drizzle and Serve
Once the bars have fully cooled, drizzle the glaze evenly across the top. Let it set for about 15 minutes before cutting into squares. Enjoy the first bite — the combination of soft crust, sweet cherries, and light glaze is pure heaven.
That’s it! You’ve just made bakery-quality Cherry Pie Bars right in your own kitchen.
Tips + Tricks & More for Recipe Success
Use Room-Temperature Ingredients: Softened butter and room-temperature eggs blend more easily and create a smooth, fluffy batter.
Don’t Overmix: Overmixing develops too much gluten in the flour, which can make your bars dense instead of soft and tender.
Line the Pan: For easy cleanup and neat squares, line the pan with parchment paper and leave a little overhang to lift the bars out once cooled.
Check Early: Oven temperatures can vary, so start checking your Cherry Pie Bars at the 30-minute mark. The top should be golden, and the center should spring back slightly when touched.
Customize Your Filling: Swap cherry filling for blueberry, apple, raspberry, or even lemon for a twist. The same crust and glaze base works beautifully with different flavors.
Make Ahead: These bars taste even better the next day once the flavors have had time to meld. Store covered at room temperature or in the fridge for up to 4 days.
Freeze for Later: Cut the bars and freeze them individually on a tray before transferring them to a freezer-safe container. Defrost at room temperature when ready to enjoy.
Add a Crunch: Sprinkle slivered almonds over the glaze for a bit of texture and visual appeal.
Double the Recipe: If baking for a large crowd, double the recipe and use a half-sheet pan.
Keep the Glaze Light: Too much glaze can overpower the fruit. A thin drizzle gives the perfect finish without making the bars overly sweet.
These small touches make all the difference between a good dessert and a great one.
How to Serve Cherry Pie Bars
Cherry Pie Bars are versatile and beautiful on any dessert table. Here are a few serving ideas:
Classic Style: Cut into neat squares and serve on a platter dusted with powdered sugar.
A la Mode: Warm a bar slightly in the microwave and top it with a scoop of vanilla or almond ice cream.
Whipped Cream Bliss: Add a dollop of whipped cream and a maraschino cherry for a picture-perfect presentation.
Brunch Delight: Serve with coffee or tea as part of a breakfast or brunch spread — they pair wonderfully with hot beverages.
Holiday Dessert: These bars shine on Christmas, Thanksgiving, or Easter dessert tables. The red cherry filling adds a festive touch.
Whether served warm or chilled, Cherry Pie Bars never fail to impress.
Serving Suggestions
For Parties: Cut into bite-sized squares and arrange on a tiered dessert tray.
For Gifts: Package individual bars in parchment and tie with ribbon for a homemade gift idea.
For Potlucks: These bars travel well and don’t need refrigeration, making them ideal for gatherings.
For a Dessert Buffet: Pair Cherry Pie Bars with brownies, lemon bars, and blondies for a colorful, crowd-pleasing display.
These little squares of cherry goodness fit beautifully into almost any occasion.
Time Breakdown
| Step | Time |
|---|---|
| Prep Time | 20 minutes |
| Baking Time | 30–35 minutes |
| Cooling Time | 1 hour |
| Glazing + Setting Time | 15 minutes |
| Total Time | About 2 hours |
The hands-on time is minimal, and most of the process is hands-off while the bars bake and cool.
Final Thoughts
Cherry Pie Bars capture everything you love about homemade dessert — buttery crust, fruity filling, and a sweet glaze — in an easy, no-fuss format. They’re perfect for beginners but impressive enough for seasoned bakers. Every bite is soft, fruity, and just the right amount of sweet.
Whether you’re baking for a holiday, family gathering, or just to treat yourself, Cherry Pie Bars bring warmth, nostalgia, and satisfaction to the table. The simple preparation, irresistible flavor, and crowd-pleasing appeal make this recipe a keeper you’ll return to time and time again.
Bake a batch of Cherry Pie Bars today — your kitchen will smell divine, and everyone lucky enough to grab one will be asking for the recipe.